How to install WordPress
Method 1: WordPress Auto-Install
This is by far the easiest way to begin using WordPress on your own hosting package. It does not require any knowledge of PHP or MySQL databases, and is similar to running a wizard or installing a program on your computer. It is important to note that auto-install is a process offered by some and not all web hosts, so if you intend to follow this method through please check that your host does provide this service. Here is a list of hosts that do:
• Bluehost
• MediaTemple
• HostGator
• DreamHost
The installing procedure for each of them is similar as their end goals are all the same. For the purpose of this Unit we will follow Bluehost’s “1-Click Install”. If your host does not offer this service please skip to Method 2: Manually installing WordPress – it’s really not that difficult, we promise!
1. Log in to your web hosting account and you will arrive at the cPanel home page. There will be a section that contains a link to the WordPress auto-installer. In this case it’s under “Site Builders”.

2. From the next page select “Install a brand new version of WordPress”.

3. The next page is where you can configure the name of your site, the password for accessing the administration area of WordPress and other options. You can match our setting in the screenshot below for a
simple installation. Be sure to use a strong password unlike the example we have used below!
4. Clicking complete will set up the site at the root of your domain (e.g. www.example-domain.com), and it will be accessible straight away. To access the administration area, go to www.example-domain.com/wp-admin. You should receive a confirmation email from your host.
Method 2: Manually installing WordPress
If your host does not offer an auto-install feature, or if you enjoy the sense of achievement that comes with doing things the hard way, you can set up your WordPress installation manually.
First we need to download the latest version of WordPress from www.WordPress.org - a fairly small file in .zip format. You will see a link to a help page detailing the installation process (which we recommend reading for a comprehensive overview). The steps are as follows:

1. Create a MySQL database via your web host cPanel interface. Most hosts will have detailed instructions for this process in their help sections too. Bluehost has a particularly good walkthrough here: https://my.bluehost.com/cgi/help/000006. Once the database has been installed you will need to create a user account to access the database. The final stage is to define the user’s privileges so that he/she has ALL PRIVILEGES for accessing and editing the database.
2. Unzip the file downloaded from WordPress.org. By default it will extract to a folder called “WordPress” containing files and sub folders. The file we are immediately interested in is called “wp-config-sample.php”. Open this file in a text editor such as Notepad (Windows) or TextEdit (Mac).

3. In most cases there are four pieces of information that need to be changed, and we’ve highlighted them in above in red. The first three (Database Name, Database User and Database Password) are the settings you will have saved in part 1. You can check these through your web host’s control panel. The last piece can be generated for you by visiting https://api.WordPress.org/secret-key/1.1/salt/ - you can just copy and paste the text that appears in your browser in place of the of the sample lines in the file.
4. Save the file with a new name - “wp-config.php” - to do this go to Save As... in the File menu and in the
same folder as before, but with the new name “wp-config.php”. It is essential that the file name is exactly this for the installation to work.
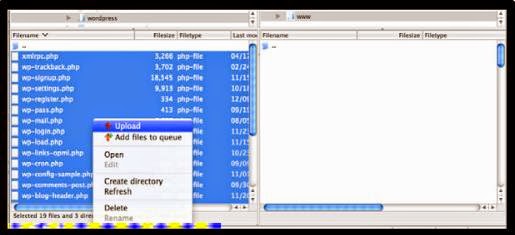
5. Now that you have all the files ready, we need to upload the contents of the folder to our web server. To do this you will need to open your FTP software (had been discussed in previous post) and connect to your web host. Normally you will want your website to be at the root of your domain e.g. http://www.example-domain.com so you must upload the contents of the “WordPress” folder to the root of your server’s web directory. This is usually /www or /htdocs, and the location your FTP software is directed to automatically by the configuration of the web host. This can take a little while as there are hundreds of small files that need transferring to make WordPress work. Sit back and let the FTP program do the legwork for you.

6. Once this process has finished, it’s time to fire up your web browser and visit the installation page for your new site. You’ll find this at YOURDOMAIN/wp-admin/install.php e.g. http://www.example-domain.com/wp-admin/install.php. It will look like above. This page is where you set your Site Name, login details and an email address – this is important in case you lose your password, so make sure you get it right!
7. Click “Install WordPress” and that’s it – visit your domain to see the beginnings of your new website!
Advanced instructions for all aspects of this process can be found on the WordPress website if you run into trouble. Our instructions represent a simplified version of the process and are intended to save you time.
Read Next - Introduction on Wordpress - Part 3
No comments:
Post a Comment