Step 5: Building the page containers
Now that you’ve set up styles for various page elements, let’s now build the containers that will house everything.
Click in the design view so that you have a flashing cursor on top of the textured background. In the Insert panel, click on the “Insert div tag” button. In the window that appears, in the ID field, type “outercontainer” as the name and click the “new CSS styles” button to apply rules to the new div.

Insert a new div tag using the Insert menu. Create rules for the new div tag by clicking the New CSS Rule button.
In the CSS rules window, select the Box category and apply a 50 pixel top margin.

Apply a 50 pixel top margin for the #outercontainer div.
In the design view, select all of the placeholder text (“Content for id "outercontainer" Goes Here”) as you would in a word processing program.
In the Insert panel, click the Insert Div Tag button. Choose the “Wrap around selection” option from the drop down, and in the ID field, enter the name “insetcontainer.” Click the New CSS Rule button to apply rules to the new div tag.

Choose the “wrap around selection” option for the new #insetcontainer div to nest it within the outer container.
In the New CSS Rule window that appears, click on the Background category. Set the background color to white (#ffffff). In the Box category, add a right and left margin of 25 pixels (px) each. Lastly, in the Border category, set left and right borders, choosing “solid” from the drop down options. Set the widths of both borders to be 1 pixel and set their color in the third column to #d7d7d7. Click ok to see the new inset container appear in the design view.
The last containers to create will house our nav, our header, the content region, and the footer. These last four will stack on top of each other within the bounds of the inset container. The first container to add is the nav. Because this container will nest inside the insert container, select all of the placeholder text once again, and repeat the same steps you took to add the inset container:
Click the Insert Div Tag button in the Insert panel. Choose the “wrap around” option, name it “navcontainer” and click the New CSS Rule button. For the rules, we’ll add a custom background color, right and left
padding (instead of margin this time), and some top and bottom borders. See the settings shown below.


Apply these CSS styles to the #navcontainer div.
Next, we’ll insert a div called “header” after the navcontainer div. This is the same process you just went through, the only difference is that you must adjust the insertion point. Instead of choosing the “wrap around” option, you’ll tell Dreamweaver to insert the new div “After tag” “navcontainer” by selecting these options from the drop downs.
Click on the New CSS Rule button to apply the styles shown in below. Once you insert this new div with its
styles, you’ll follow this same process to insert the content and the footer divs to finish out the structure of the web page.
Choose the “after tag” option, and then select the “navcontainer” from the drop down.


Apply these CSS styles to the #header div.
Create and insert two final “content” and “footer” divs, one after the other. Like before, click on the “Insert Div Tag” button in the Insert menu, select the “after tag” option, and then select the previously created div. For the #content div, apply the CSS styles shown in below.

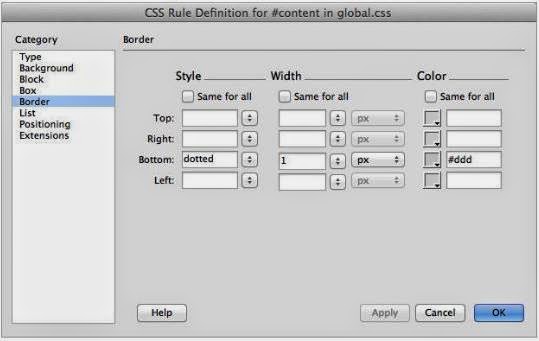
Apply these CSS styles to the #content div.


Apply these CSS styles to the #footer div.
Next - Preview your work
No comments:
Post a Comment