Step 1 : Adding & styling the nav elements
From the project folder, open the index.html file provided for you in the Stage 1 folder.
Select the placeholder text inside the “navcontainer.” In the Property Inspector panel, click on the bulleted list icon to turn the placeholder text into a bullet entry. Replace the text with “Home” and then press the Enter key to add two more bullets “Products” and “About Us.”

Replace the place holder copy with a bulleted list that will become your nav structure.
While your cursor is inside any one of the list items on the design view, in the CSS panel, click the “+” icon to create a new rule for our list elements. In the window that appears, you’ll notice it tracks the path to our list item starts with the outer container.
Click the “Less Specific” button a couple times until the path begins with the #navcontainer div. The path is important because only list items found within the #navcontainer will receive this CSS treatment we set up. Any other list items elsewhere on the page will not be affected.

Edit the path to the list item so that it is less specific, just starting with the #navcontainer.
Apply the CSS rules for our list items as illustrated in below.


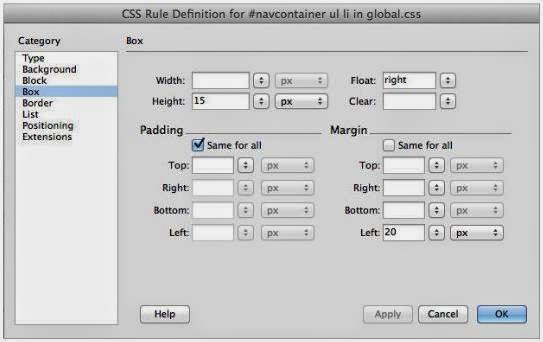
Apply these rules to your list items within the #navcontainer.
Next, we’ll apply a couple of rules to the “ul” parent level that contains our list items. This way we can nudge the placement of the entire list through padding and margin. To target the “ul” level, place your cursor in one of the list items and click the “+” create new CSS rule button. In the window that appears, click the “Less specific” button a couple of times until the path starts with #navcontainer. Now, at the end of the list, delete the “li” so the path ends with “ul” – the element we want to target.

Edit the selector so that it ends in “ul”.
Apply styles for the “ul” element as below illustrates.

Apply padding and margin settings to the “ul” element.
You’ll notice that the float right property scooted each list item over to the right in the order it was typed. Therefore, the “Home” item is on the far right. To remedy that, you can simply retype their names in the code view.
Now, to make each list item a link, select each one’s text individually (either in the code view or in the design view), and in the Property Inspector, enter a link in the text field. For Home, enter index.html. For Products, enter products.html. For About Us, enter aboutus.html. Use all lower case with no spaces. Save your work.

Add links to each nav element using the Property Inspector.
Next - Step 2: Adding & styling the header elements
No comments:
Post a Comment