Slices or sprites?
If we create all page elements in a single design document – as many designers do – we have a few options in terms of delivering the final images to the user. The tried and true method is to save each individual page elements as its own slice of the puzzle. Each slice is then saved in a web-friendly image format and referenced from the code.
But many modern designers are taking a slightly different approach by storing groups of related slices inside a single image. This larger image is referenced from the code, with additional bits of information: coordinates of the portion we want to show at any given time.
You have probably encountered this without realizing it, particularly if you are a Facebook user. Facebook has numerous icons in the navigation bar and elsewhere throughout the site. Instead of saving them all as individual little images, the site developers save them in blocks, called sprites.

Above shows an example of one block of sprites, all contained within a single image file. Whenever one of those sprites is referenced in a page, the coordinates of that particular piece of the image are specified in the style sheet, using the background property. The dimensions of the sprite are determined by the width and height properties, so the browser knows exactly how much of the overall image to display in each instance.
Here’s an example of what that might look like on a style sheet:
#likeButton {In this case, the height and width properties determine the size of the window opening, so to speak, and the dimensions at the end of the background property identify the location of the x- and y-axis starting points.
width: 18px;
height: 17px;
background:url(‘icons-sprites.png’) 238 102;
}
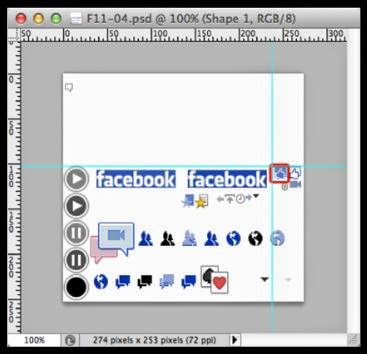
Above shows which portion of the Facebook sprite image would be shown using this code.
If the thought of having to figure out all the dimensions and coordinates for each individual sprite seems daunting, relax. There’s an app which does just that for us! Spritebox (http://www.spritebox.net) is a free online tool that quickly and easily generates all the necessary code.
Slicing designs
An alternative to using sprites is to save each individual piece of the puzzle as its own image. Before Photoshop added the Slice tool, designers had to crop individual portions of a design, and save these pieces as unique files. The process was not only tedious and time-consuming, it also made subsequent maintenance of the images challenging.
Fortunately the Slice tool speeds up the whole process while leaving the overall design intact for easy maintenance. In fact, Photoshop has several built-in tools to make the slicing and dicing process fairly painless.
Ultimately, which tool we use depends on how we built our design. If each individual image-to-be is on its own layer, we choose Layer > New Layer Based Slice and have Photoshop create a slice based on the contents of the currently selected layer. If our design is fairly grid-based we can draw up some guides, select the Slice tool, and click ‘Slices From Guides’ in the Options bar, as shown below.

If neither of these automated methods is suitable for a design, we can draw our own slices. Simply select the Slice tool, then click and drag around the outside of each image we want to slice.

In above, we drew slices around each of the elements we intended to save as individual images. (The one exception is the background image, which has to be saved out separately since Photoshop doesn’t allow overlapping slices.)
Read Next Web Development : Image Formats & Optimization - Part 3
No comments:
Post a Comment